Sunday, February 22, 2015

Quiet Book for Baby A

I discovered quiet books on Pinterest and knew they were something that I'd like to try my hand at making. I made one for my niece's 2nd birthday and then another for Caroline for Christmas. After seeing those, a friend asked if I would make one for her son's 2nd birthday. She found pages that she liked on Pinterest and I basically copied them. So none of these ideas are mine - just putting that out there. There are several blogs that have amazing examples of quiet books.

This book had 16 pages, so there are a lot of pictures to show. A lot.


The cover is made out of flannel and I made sure to include a flap to keep it closed. I used button holes on each page and on the cover along with 2 inch binder rings to secure all of the pages.

A train with wheels that button on and off and blocks being stored.


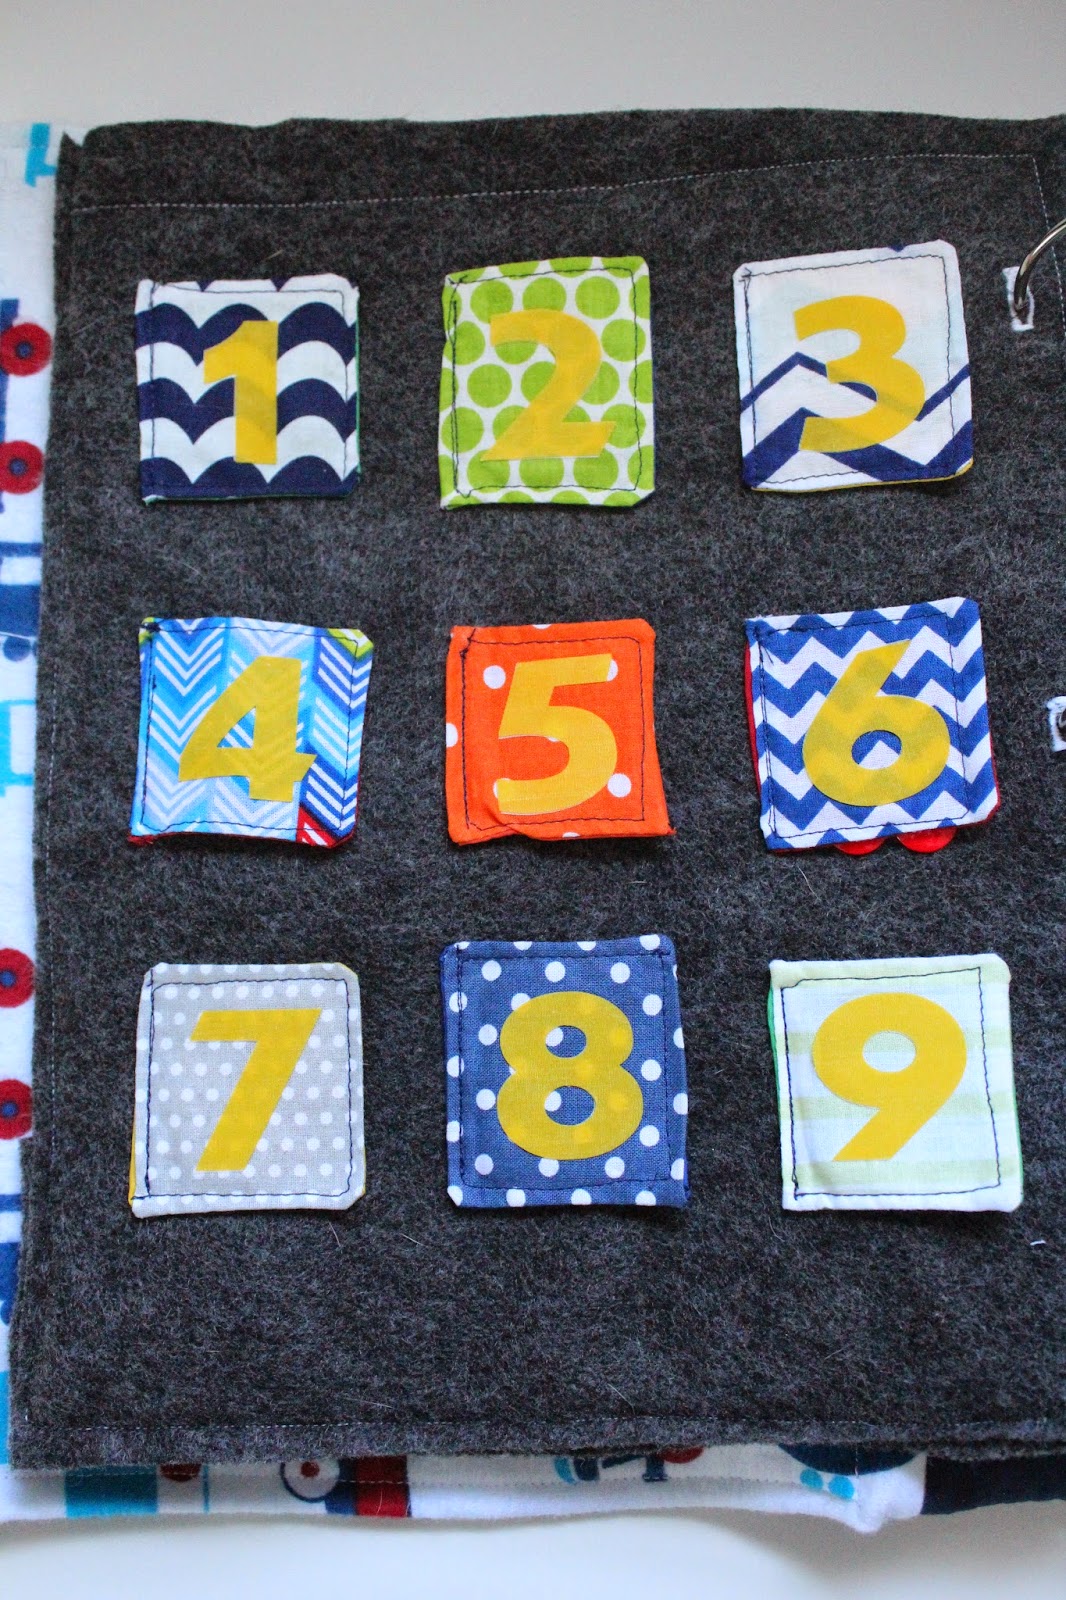
This page was a real labor of love, but I love how it turned out. Behind each flap are the buttons to match the number on the flap.

This was another really labor intensive page. The child will match the crayons with its colored tip that's sewn on the page. The crayons can be stored in the little crayon box.


No quiet book would be complete without a tying page!

The piggy bank page is a back to back one so the child can put coins in the bank and then get them out of the zippered page on the back side.

Another quiet book staple: the shape matching page. 


I'm not sure that a two year old will ever see a real life phone with a cord, but he'll be able to practice dialing. The next page is a little phone book so he can practice numbers and recognize family members.


I've included a mailbox page in each of the books I've made. I found a great tip for the flag: they used a grommet and then sewed a button up through the grommet. It worked like a charm! The mail was actually pretty fun to make, but the mailbox filled up quickly.


The barn with doors that open to reveal finger puppet animals!


A tetris style puzzle page:


An abacus page:


 This boy dress up page was really cute. The costumes hide in the treasure chest.


Last, but not least, the sailboat page. It was the first time I sewed a zipper! The octopus and whale hide in the zippered pouch.


That wraps it up! It was so fun to make, but definitely a huge undertaking! I hope Baby A enjoys it for years to come!!

Thanks for reading,
Kathleen

Sunday, April 6, 2014

Fabric Alphabet Magnets


When Bill built our baby gate, we decided to use magnetic primer and chalkboard paint on the main panel. Since Caroline is too young to use chalk (I tried it and she shoved it right in her mouth) we're taking advantage of the magnetic feature right now.

I would love to say that I whipped these alphabet magnets up in an hour, but it was a more time consuming project than that. I'd say I spent a total of 10 hours over the course of a few weeks to complete them all. It wasn't hard work, but there are 26 letters!

I started by ironing some heat n bond onto my fabric and using the Silhouette to cut out all of the letters.

Then I ironed some interfacing onto several different fabrics to make them stronger and more durable. I cut the fabric into rectangles and ironed the letters onto the rectangles.


I used a layer of batting to give the letters a little heft and to give the magnets something to grasp. I folded the rectangles in half and sandwiched in the batting with a strong magnet on either side of the batting. I sewed the batting in place on the folded edge and continued to sew around the perimeter of the rectangle. After I finished sewing, I trimmed the fabric and was left with nice, neat magnets.


This basket came from the dollar spot at Target and holds the extra magnets when they're not being used.


Caroline likes to play with them, so it was definitely worth the time and effort. She is especially intrigued by how they stick to each other!


I love the mix of fabrics and the personality that they add to the baby gate. I'll probably make a few more with repeats of letters so we can actually write words like "mom" and "dad." Luckily we can at least write Caroline!

Thanks for reading,
Kathleen

Friday, March 21, 2014

Monthly Baby Onesies

File this one under "I wish I thought to do this before Caroline was born."

I take photos of Caroline each month to document all of her changes. I use a plain white onesie and blocks to spell out her name and how many months old she is. I've seen so many variations on the monthly photos and I can't wait to try out some new ideas when we have a second baby.

A friend of mine is expecting a baby at the end of May. Its their first child, so as an "experienced" mom (I use that term loosely!), I thought it'd be fun to give her special onesies to use for monthly photos.

 The parents-to-be decided not to find out whether they are having a boy or girl, so I stuck with grays and yellow. I'm including some bows in the package just in case they need to girl-ify the photos :)
 I just love how the onesies gradually get larger, although it was a challenge to decide what sizes to buy. I hope they fit every month, although it could provide a few laughs if the baby is a little chunker :)
I'm considering making a few sets of these to sell in my etsy shop. Is this something you would think about purchasing as a special baby gift? They certainly are precious!

Thanks for reading,
Kathleen

Thursday, March 20, 2014

Overlapping Wall Frames & Mirror

Unbelievably, we've lived in our house for almost four years. I'm at the point where I'm starting to tire of the original decor and am ready for some changes. So as not to drive my husband batty, or spend a ton of money, I started small.

Right after we moved in, I hung a photo gallery wall with a big mirror on the main wall in our kitchen. I loved it at first, but it was starting to feel too busy to me. Once again inspired by pinterest, I decided to try something new.

I painted the mirror a creamy off-white and found a great deal on frames that I had been obsessing over at Target. My husband helped to hang the frames so they overlapped. We used wall anchors and then some really long screws so that the screw could stick out about an inch from the wall.


I just adore how it turned out. Simple but grown-up.
I have since put in photos of our family, but I never had a chance to take new photos while it was actually sunny outside... maybe because it seems like winter is here to stay forever.
I also updated our $10 thrift store dresser, but that's a post for another day :)

Am I the only one that feels the need to redecorate on a constant basis? I am considering having a garage sale to try and sell some of the things that I have phased out, but I don't know if I'm quite that brave. Any suggestions?

Thanks for reading,
Kathleen

Sunday, February 23, 2014

Pinterest Strikes Again - Sweet Nursery Art

A lot of the projects that I take on have been inspired by Pinterest. Today's post was no exception.

My friend's son is turning one next week and she pinned something on Pinterest that I knew I could recreate for her.

I used my Silhouette to cut out the giraffe - I purchased him from the Silhouette store. Then I used the sketch pen to write out the baby's name and birthday. The sketch pens still don't quite work for me, so I ended up using a different white pen and filling in the letters. After popping it into a matted frame, we were good to go.

I think its pretty sweet and might just be my new go-to baby gift. If there was any free wall space in Caroline's room, I would totally make her one!

I love giving handmade gifts, even if I don't always have time to create them. I received several handmade items at my baby showers and they were each so thoughtful.

Do you have a go-to baby gift? After having Caroline, my idea of a great baby gift has changed - practical is best, handmade is a bonus, and I most definitely pay attention to the season when buying clothing in a bigger size. So many things to think about!

Thanks for reading,
Kathleen


Friday, February 21, 2014

Leap Frog & Additional Nursery Updates

We've been pretty busy around here... Caroline is already 9 months old and she is a bundle of energy and fun. We are having a blast watching her grow and explore, but its taken us a while to get back into the swing of completing projects again. We've updated a bunch around the house over the past few months and I'm going to try and write about some of the projects soon. 

Before Caroline was born, her nursery was in pretty good shape. It is by far my favorite room in the house. Since I have spent so much time sitting in the glider feeding her, I am constantly staring at the gallery wall. 


This is what it looked like before she was born. 

I learned pretty quickly that the adorable banner needed to be taken down before Caroline decided to take matters into her own hands. That freed up a bunch of wall space. I did not want to put anything up there she would be able to pull at and potentially hurt herself on, so my mind went to the vinyl wall clings. Then I realized that my Silhouette is my best friend could create the look I wanted for a fraction of the cost. 

I downloaded a frog picture from the Silhouette store and then copied it several times and adjusted the sizes to maximize the number of frogs I could cut from the one 12 x 24 inch sheet of vinyl.


I ended up with 7 frogs. The Silhouette did its job and cut them out and I carefully placed them on the wall. We have affectionately named them uno, dos, tres, quattro, cinco, ces and ciete. (Forgive my spelling, I never took a Spanish class!)

Look at how little Caroline was when I actually did this... she was only 2 months old!

The frogs filled a portion of the wall space, but there was still space to fill. One day I was browsing the aisles of Target and came across these adorable animal hooks. The colors were great and it just so happened that we needed a place to hang the diaper bag. I bought two of them and then Bill secured them to the wall using anchors and screws. We don't want anything falling down once Caroline starts grabbing at things!

The latest update came as a necessity as Caroline started grabbing at anything that is within reach while we change her diaper and get her dressed. This included the sound machine and humidifier. For now, the humidifier has moved to the ground. We're hoping to find a more permanent home, but space is at a premium in the small nursery. The sound machine has found its forever home on the wall. Bill used some velcro command strips and attached it right next to the frogs. It can easily still be plugged in and it is now out of Caroline's reach. Problem solved!
So that's the progress on the nursery for now. I'm sure the room will continue to evolve as Caroline grows and I can't wait to see the changes.

What have you needed to change in your kids' rooms as they've grown? Any heads up would be greatly appreciated!!

Thanks for reading,
Kathleen