Showing posts with label paint. Show all posts

Wednesday, August 1, 2012

Buh-bye Shiny Wood Veneer!

I love a great deal. When I was browsing through my local Salvation Army several months ago, I found a dresser that was tagged for only $10. Actually, $9.99. It had certainly seen better days, but I was confident that I could rescue it with some paint.
It actually doesn't look half bad in the picture, but in real life the veneer was really shiny and totally clashed with the colors in our kitchen. All of the trim in the kitchen, dining room and living room is overly lacquered wood. I couldn't handle anymore shiny wood tones. 

By the way, I'm fully convinced that the only reason Bill picked it up at the store and helped me move it into the house was because it was my birthday. Love that man!

Priming and painting the dresser wasn't as bad as I expected. I sanded all of the surfaces first with the palm sander and then rolled on the primer with one of those 6 inch foam rollers. After letting the primer soak in for a day, I got to painting. Bill suggested I paint it a really, really, really pale gray. Initially I wanted to paint it white, but the floors in the kitchen are orangey-tan and off-white tiles so the white paint really would not match. So I picked up a half gallon of pale gray paint and got to work.

It ended up taking 3 coats of paint. I probably could have stopped at two coats, but I figured I was better safe than sorry. She's been living in our kitchen for about 6 months now and I can't imagine the space without her. Ha - I'm talking like the dresser is an animate object. Isn't she pretty though?
Try to use your imagination and picture crisp white trim and dark hardwood floors. That's the long-range plan for this room... once the money tree in the backyard starts producing some $100 bills!
The dresser provides us with a lot of useful storage in our kitchen. We keep all sorts of things in there, from nice paper napkins to waterless doggy shampoo. It also provides another surface in the kitchen. Its really useful during parties, like my sister's bridal shower. Plus, I get to decorate it... always a bonus :)
I change stuff out a lot, especially depending on the season. I think its nice and summery now. You can also see the "you & me" wire art living here. That piece is available in my etsy shop!

I'm starting to think about painting the top, either a different color or with a pattern/stencil. Any thoughts on that? I don't want it to be super busy, but I'd love to add a little more interest to it.

Ok, I want to hear about other thrift store finds. I was pretty amazed by this $10 find and snatched it up before someone else got the chance. What great finds have you found at the Salvation Army or Goodwill? Please share!

Thanks for reading,
Kathleen

Linked Up at: 
DIY Show Off


Jennifer Rizzo Link Party
 

Miss Mustard Seed


Thirty Handmade Days

Tuesday, July 31, 2012

How Great Thou Art

Free, personalized art that is! It's not a secret that I'm a fan of anything free. Well not maybe not anything, but if it can decorate a wall in my home then I'm a fan. Since I put myself on a spending freeze, I've been thinking a lot about how I can use what I already own to make pretty things.

A few years ago, I bought a few canvases to try my hand at painting. Let me just get this out there - an artist I am not - but I can create things that involve structure. Hand me painters tape and I'm good to go. So I gathered up a canvas, two different sizes of painters tape, some scrap book letters and spray paint.

I laid out the letters on the canvas first. I have to admit that I thought it was pretty cute at this stage and I may have inspired a future project!
Needless to say, I pressed the letters on in the (approximate) center of the canvas. I basically just eye ball the placement of things like this. Then I took out my tape and played around until I found a placement that I was happy with.

At this point I was ready for spray paint. I laid the canvas out on some newspaper outside and got my spray on. I did a few light coats, waiting about 15 minutes in between coats.

Of course Simon was waiting for me in the window!

{are you done yet? I just want to lay on the couch with you!}
 About 15 minutes after the last coat of spray paint, I peeled off the tape and letters. I'm not going to lie, I was a little nervous. I was scared that the paint would seep under the tape or the letters would look crooked. Much to my relief, I had this:
The paint did leak a little bit around the letters, but I actually don't mind it. The letters were a little old and were a mix from a few different packages, so it just looks handmade. And I'm fine with that!
I'm sure you're wondering where I found room to hang this since the walls in my house are pretty full. There is actually the perfect little wall in the hall leading into our master bedroom. I get to see it every night before bed and right when I get up. I even smiled this morning looking at it when I had to get up early for a day full of student learning objectives. (Consider yourself lucky if you don't have to deal with those!)

Forgive the photo, it was getting dark when I took this one and the lighting in our bedroom isn't that great.
Ten points if you spotted Simon!

So that's my latest no cost project, although it would still be pretty cheap even if you didn't have all of the supplies on hand. And its personalized and meaningful to Bill and I. Score!

What have you spray painted lately? I can't be the only one amazed by its awesomeness!

Thanks for reading,
Kathleen

Linked Up at: Eclectically Vintage
Elizabeth and Co.

Creations by Kara

Wednesday, July 4, 2012

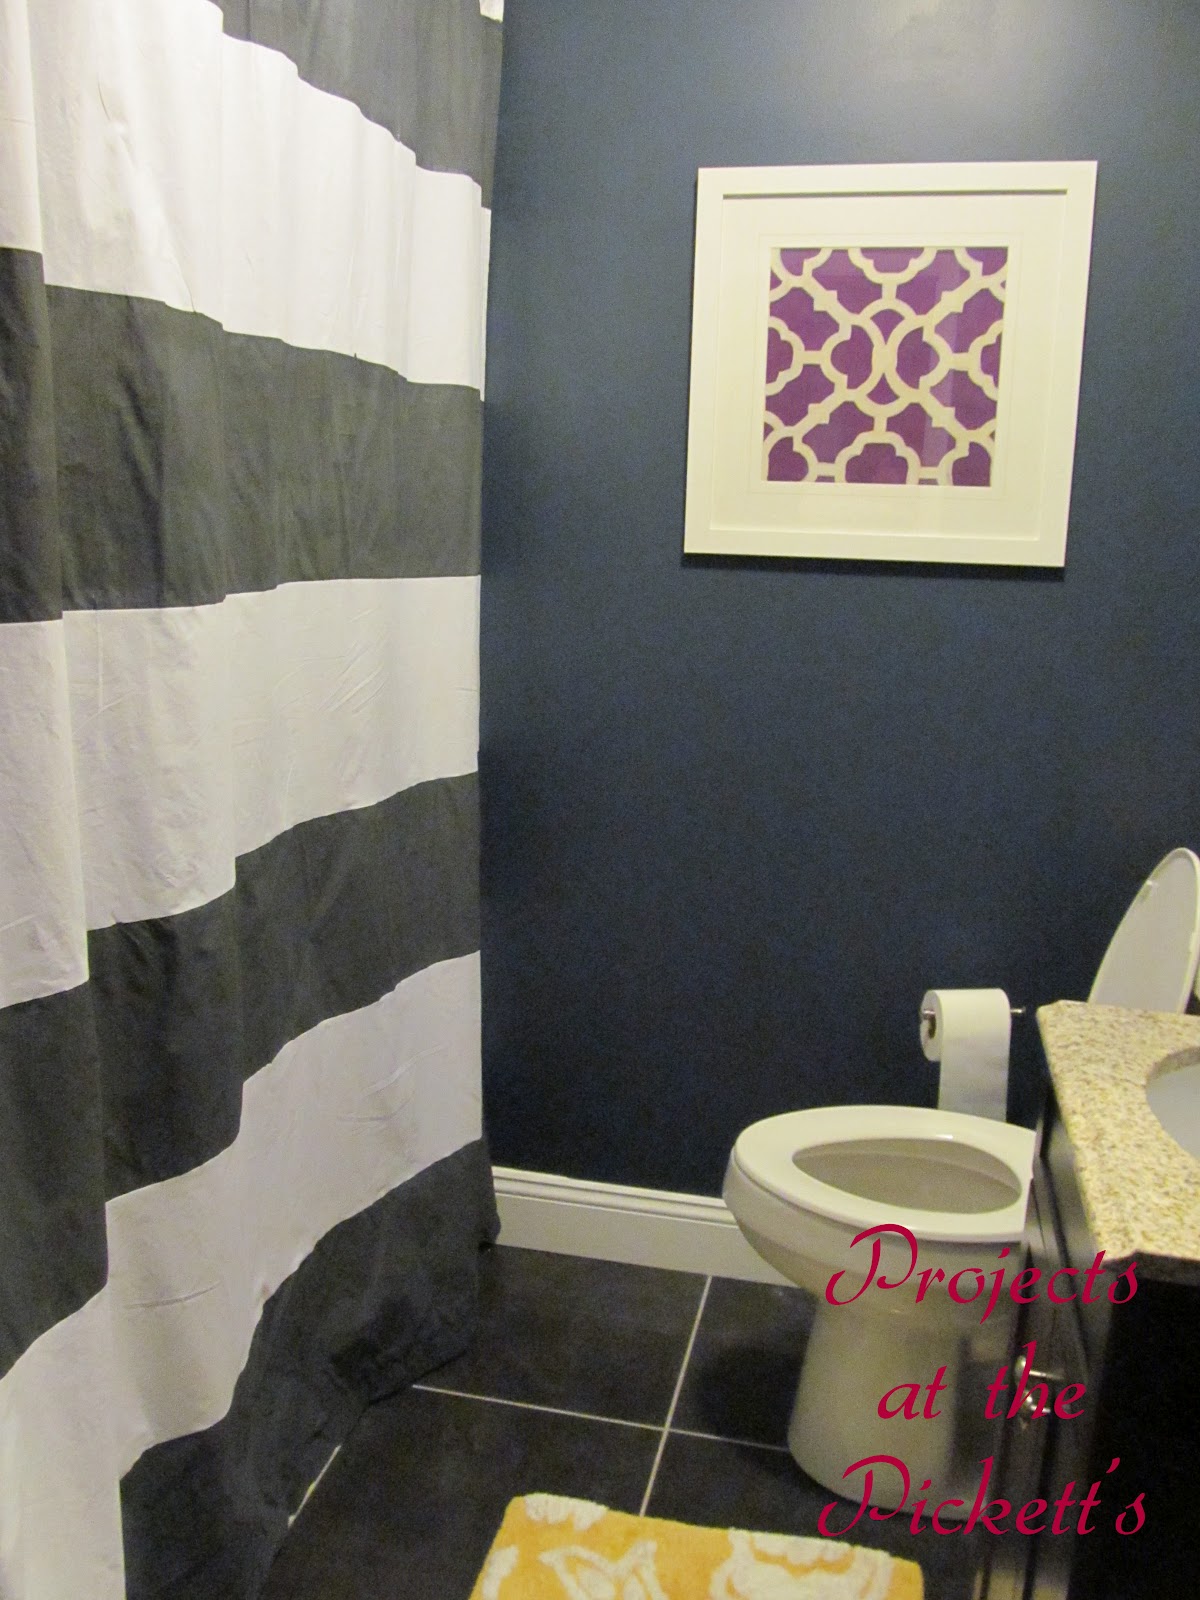
I Painted a Shower Curtain?!

Say the title of this post like Baby said, "I carried a watermelon?!" in Dirty Dancing. That's about the astonishment I'm looking for.

At this point, you know that we've been renovating our guest bathroom. When I last left you, it looked like this:


It was coming along, but still lacked a few necessities - like a shower curtain. I've been eying a certain striped West Elm shower curtain, but when I went to order it the curtain was back-ordered for almost a month. There was no way that I could wait that long, so I starting looking on Pinterest for diy shower curtain tutorials. I was lucky enough to happen upon this blog and her awesome tutorial.

I headed to the store where I bought a white twin flat sheet and fabric paint. I wanted to have gray stripes, but unfortunately the world of fabric paint isn't on the gray bandwagon yet. Thank goodness for elementary school art class, because I quickly realized I could just mix black and white paint. Problem solved. I bought two tubes of each and was on my way.

When I got home, I hemmed the sheet so that it would be the perfect length for our shower. I also snipped an opening in both ends of the factory-made hem so I could put the shower rod through the top of the sheet. There was no way I was going to attempt to make button holes!

My shower curtain conveniently ended up being 77 inches long, so I made seven 11 inch stripes. Taping out the stripes on the fabric was definitely more of a pain that measuring on the walls, but I ended up with this:


Next, I mixed together the paint until I ended up with a shade of gray that I liked. I used two tubes of white paint and just one tube of black.


Painting the stripes took about an hour and a half, again it was much more difficult than painting the wall. I was in the icky basement too, so I think that made it feel like it was taking forever!


I pulled the tape immediately and then left it to dry in the basement overnight. I hung it in the bathroom today, and I am so happy with the results!


After a few tries, I finally found a bath mat that I liked. It breaks up all of the geometric patterns and adds a little feminine touch. It came from Target, of course!


The framed geometric print came from Home Goods. (I was there returning one of the failed bath mats!) I love how just a few things have added so much vibrancy to the room. I finally added a towel bar and a robe hook that we'll use for the hand towel for now.


I'm still on the hunt for some sort of storage piece to fill the corner next to the vanity, but it's certainly really close to being complete. It feels amazing to have a bathroom that we designed completely and that really reflects our style. I love it :)

I hope everyone enjoys their 4th of July! We saw The Amazing Spider-Man this morning and I must admit that it was really good. I'm heading to the pool in a little bit. What is everyone else up to? Any house projects or just enjoying the day with family and friends? Whatever you do - enjoy!

Thanks for reading,
Kathleen

Thursday, June 28, 2012

The Bathroom is (Almost) Finished!!

After what seems like the longest six weeks ever, our bathroom is almost finished. Its completely functional now, but still needs the accessories. Basically, the hard work is done and now I can do the fun part of picking out a new shower curtain and towel bar... fun times!

Six weeks ago, after demolishing what was there, we had this:


And now we have this!


Try to ignore the fact that there are no doors on the vanity and the toilet paper is sitting on the counter. Those are just minor details after all the work that went into this space. We hired someone to do the sheet rock and tile the floor, but we Bill did the rest. Well, I painted and did some little touch up things, but Bill did the majority of the work.

The wall color is Newburyport Blue by Benjamin Moore, and I'm in love. Originally, I wanted to paint the walls navy but with the dark tile, I decided to lighten up just one shade. This was my first time using Benjamin Moore paint because I'm usually too cheap, but I'm a convert now. Even with this dark color, it only took one coat of paint. It was well worth the extra ten bucks!

The tile is 18 inch square charcoal gray porcelain tile that we found in the discount room of a local tile store. We lucked out because we didn't need a lot of it - the room is only about 4' by 8'. Bill chose the light gray grout and I think it was a great decision.


We left the shower and tub intact from the start. It was just replaced before we bought the house and I think it's only been used twice since we've lived here. We also reused the crown molding and just repainted it white. I love how it really finishes the room.


The toilet, vanity, and medicine cabinet were all from Lowe's and both lights were from Home Depot. We were fortunate to find a nice vanity that would fit in that tiny space!


The room is looking very masculine right now, but I'll girlify it one I buy the accessories. Yes, I just used the word girlify. Good thing I'm not an English teacher! I'm also trying to figure out what to put in the corner next to the vanity. Its about 18 inches wide, so its a decent little plot of space. We definitely need more storage in here, so it'll have to be something that will do that job. I'll keep you posted on that progress, along with the other pretty details to come!

Bill and I are both relieved to finally have the bathroom functioning again. We have two other bathrooms in the house, but this was the guest bathroom so its nice to have some place for guests to go instead of our master bathroom. This was our first major renovation and I have to say that it was successful! I don't think we'll be tackling any big projects again for a while. We need a rest from the big things, but I'll still be working on other things around the house - you can count on that!

Who else has tackled a full bathroom renovation? Isn't it gratifying to pick out exactly what you want, instead of just living with what someone else picked out? I love it :)

Thanks for reading,
Kathleen

Monday, May 28, 2012

Outdoor Updates & The Completed Mantle

We were lucky when we bought our house that the previous owners had done a lot of landscaping and maintained the curb appeal of the home. We have good bones to work with. Over the past two years, we've been much more consumed with projects on the interior of the house than the outside.

In the fall, we had a new driveway put in. It was a big ordeal and quite expensive, but well worth it. We also transplanted some irises from my sister's house last year that have spread and bloomed beautifully. We inherited a few rose bushes that are very hardy and those are blooming now as well.


Over the past month or so, Bill has been working on improving the front yard. None of the changes were expensive, but they each had an impact. First, he painted the railings on the front stoop. The railings were originally green, but we decided to freshen them up with crisp white paint.


It's a little hard to see because of the reflection of the flag in the door, but I made a wreath for our front door similar to the one I made for my Grandma's birthday. I included our house numbers on ours for a little added functionality.

Bill is not a big fan of painting, but while he had all of the painting supplies out he decided to paint the fence that faces the road as well. Its a wooden picket fence that hadn't been finished, at least not well. This obviously took longer than the railings, but it was also worth it. You can see it peeking through on the left side of the house in this picture:


Last week, I shared how Bill and I took this show our tools on the road to redo my sister's mantle. We left it like this:


Then my sister primed and painted it, so now it looks like this:


I think it looks great! She's still on the hunt for a large mirror to go between the sconces, but it looks fabulous right now. The best part is that she loves it and it checked something off of her busy pre-wedding to-do list. Glad we could help!

Lastly, Happy Memorial Day! Thank you to all the men and women who serve this country everyday to protect our freedom. After spending three days touring Washington, DC and witnessing an amazing full military ceremony at the Tomb of the Unknown Soldier, I am especially appreciative for all of the sacrifices that have been made so that we can live the lives that we do.

Thanks for reading,
Kathleen

Tuesday, April 10, 2012

Two-Faced, in a Good Way

I've been seeing a lot of pillows on pinterest and other blogs that have writing or designs on the front of them. While I was in Micheal's the other day, I picked up some black fabric paint so I could give this a try. I played around in Word until I found a font and symbol that I liked. Then I made the font huge, like 750 or something ridiculous, and printed it out. Here are my supplies, all ready to go:


Basically, I put the printed out symbol under my fabric and traced it with the paint. I used a cheap linen fabric so I wouldn't be heartbroken if it didn't work out well. Luckily, after about 15 minutes I was left with a nice looking hand-painted ampersand.

In order to make the pillow a little more interesting, I used a different fabric for the back side. I sewed the pillow just like I learned in middle school and then used some stuffing from the yucky pillows that came with the furniture to fill it. Lastly, I hand sewed the bottom shut. Ta Da!

Here's the front:
And the back:


I tried to get a picture where you could see both sides, but it was a little difficult. Here was my most successful attempt:


For now the pillow is living on the couch in our living room. The fabric is so versatile that it might make a move. Our guest room needs a little love, so maybe it'll go in there.


I never thought that I could hand paint something and it would be nice enough to display in our home. There was a little cheating involved since I was just tracing, but I'm still proud. File this one under another cheap and easy project! My sewing machine is getting a lot of use this week. Bill said that sewing machine Christmas sure beat yoga Christmas since I'm actually using the machine so much! Who else has projects going on this week? The weather is so gross out that we're only focused on the inside this week. We can't be the only ones!

Thanks for reading,
Kathleen

Linking Up at Making the World Cuter

Tuesday, March 27, 2012

Diamonds are a Girls Best Friend

White walls bore me. I bought my first house because I was tired of looking at plain white walls in my apartment. As soon as I moved into that house I painted every room in it. My craft room is the only room in our current house that has white walls. I added chevrons to the short front wall, but the rest of the room is white with white trim. For a little while, I was enjoying the serenity of it.

After spending a few hours at my white craft table in my white craft room last weekend, it was time for a bit of a change.  I built the craft table several years ago from a pre-finished plank of wood and four plumbing pipes. I painted the top white, since I was unfamiliar with staining and then spray painted the legs black. Come to think of it, the legs of this table may just be the first thing I ever spray painted in the name of home decor!

 
Clearly, I enjoy geometric patterns. Chevrons, stripes, the stencil and even different fabrics I've used are all inspired by geometry. I brainstormed a bit and of course turned to pinterest to find some new ideas. I needed something that would be easy and quick. This couldn't turn into an all day project, just something to allow me to procrastinate grading papers. I started to think of different ways I could tape off a pattern on the table top and it suddenly hit me: diamonds!

This was a really easy project, especially since I had all of the materials on hand. I used green frog tape, a speed square and paint. I used the speed square to ensure the diamonds were all evenly spaced and equal in size.


Tape of the lines in both directions to create the diamond pattern. I actually liked the look of it just using the tape!


Make sure that the background color is the color that you want to create the lines on the desk. You should actually make sure of this before you start any of the taping. I wanted gray to be the predominant color of the desk, so I didn't need to paint the whole desk first. Ok, now that I've cleared that up...


I painted two thin coats using the same gray paint that I used for the chevrons.  As soon as the second coat was dry, I pulled up the tape. I was amazed at how crisp the lines were!


Once the paint was dry, I put my sewing machine and a basket back on the table top. I just love how it came out.


Here's a view looking right at the desk so you can see the whole pattern.


Since I used materials that I already had, add this to the free project list. It adds a little character to this side of the room.  I still think I might want to paint the walls. Maybe over April vacation? We'll see!

Thanks for reading,
Kathleen I linked this post at:
Home Stories A2Z